One of the best things about Japan is that it is very, very convenient to get around through the use of their very well-connected public transportation systems. In cases where public transportation is not so accessible, it is also easy to rent a car or hire a taxi cab. When traveling in Japan, here are several things to know:
1. Japan Railways Group (JR Group) and the JR Pass
Purchase JR Pass before leaving for Japan ⇒ Receive Exchange Order ⇒ Activate JR Pass when in Japan ⇒ Enjoy unlimited travel
The JR Group covers a big part of the public transportation system. It includes the Shinkansen high-speed rail lines, limited express, express, rapid and local trains, the Tokyo Monorail, the JR Ferry to Miyajima (Hiroshima), and JR buses.
Getting a JR Pass is a great investment. Individual ticket costs for the JR can build up fast. If you’re planning on using the system a lot, which will definitely be the case if you are traveling between cities, then I would absolutely recommend getting the pass because you will make back what you paid for and more! The pass is also only offered to foreigners as part of the Japanese government’s incentive to promote tourism, so why not take advantage of this perk?
The Japan Guide has VERY comprehensive info on the JR Pass, but I will go over some of the main points of the JR Pass here. So what should you know about the JR Pass?
- It offers unlimited use of JR trains for one, two, or three weeks.
- The pass comes in two types: ordinary and green pass. The green pass essentially gives you exclusive access to first class cars that offer more spacious seats than ordinary cars. The catch for the green pass is that it’s more expensive and you will have to reserve seats beforehand. For the ordinary pass, you can also choose to make seat reservations for longer, more popular train routes (such as from Aomori to Sapporo, which btw is super full all the time) but it’s not required! From experience, I would suggest just getting the ordinary pass.
- Don’t want to pay for the full pass? There are separate JR Passes that are cheaper and split up by region. For example, when I traveled to Hiroshima and Kansai (Osaka, Kyoto), I got the Kansai Hiroshima Area 5-Day Pass because it was cheaper and more worth it than getting the full JR Pass OR separate Kansai Wide Area Pass + Hiroshima-Yamaguchi Area Pass. So make sure to check the cities you’re traveling to and which regions they belong to before purchasing your pass! Navigating which pass to get can get confusing, so don’t hesitate to tell your JTB officer or sales agent which cities you plan on visiting and have them help you out! 🙂
Where can I buy the JR Pass?
JR passes are only sold outside of Japan. You can go to one of the designated sales offices/agents before going to Japan. I usually get it at a JTB office, but you can also get them at one of the following: Nippon Travel Agency, Kintetsu International, Tobu Top Tours, Japan Airlines, All Nippon Airways, and JALPAK. JR Passes can also be purchased online and mailed to you.
Once you have determined the type of Pass you want, you will need your passport to purchase it. After your payment, you get something called an “Exchange Order” (click to see example) as proof of the Pass purchase. Keep this safe and bring it to Japan with you!
What should I do to get the JR Pass when I get to Japan?
After arriving in Japan, you can go to the JR Pass Exchange Office, located in the airports and most major JR stations in Japan, to trade for the actual pass. Present your JR Exchange Order and your passport with the custom/immigration stamp on it. The JR representative will ask you to select the start date that you want for the pass. All passes last until 23:59 (11:59 PM) of the last day.
Reminder: get your passport stamped at immigration/customs (although I can’t think of a reason why this would not be the case…) because you will need it to prove that you’re legally in Japan as a foreigner when exchanging for your JR Pass!
How do I actually use the JR Pass?
When entering the JR station, go to the very side of the gates/turnstiles. There will be a window with a station personnel standing there. Show your pass to the personnel and he/she will let you pass through if you have the correct pass for the region. Same process for when you want to exit the station.


2. Subway/Metro
For local, short distance traveling, it is easy to get around using the subway. To do so, you must buy a ticket at the ticket machine first (or use the Pasmo/Suica card mentioned in part 4).
How to use the subway ticket machine
There is usually an English option (look for it on the screen). Look up at the big board above you to figure out the station you want to go to. The one-way price to get to that station will be listed. Insert coins or bills into the machine and choose the number of people. Then press the price of the ticket you want to get a pass for (ex: 170, 280, etc). The ticket and change will be generated. The ticket machine do give change in bills so don’t be too worried if you only have bigger bills.
How do I board the subway?
After getting your ticket, insert it into the subway ticket gates/turnstiles. Remember to grab the ticket after you pass through since you will be needing it again when exiting. Same process for exiting, except this time you won’t be getting the ticket back as the machine collects it permanently.
Train etiquette
- Queue Even if there are a lot of people, remember to line up in an orderly fashion when waiting for the train.


- Women Only Carriages During rush hour in Japan, there are Women Only carriages so make sure to check before you board to make sure that you don’t board the wrong carriage. You can look for this sign to make sure:

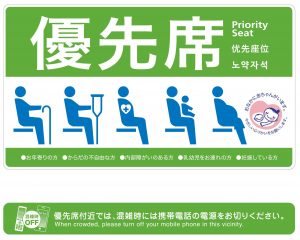
- Priority Seating Paying attention to priority seating is pretty important in Japan. In San Francisco, at least, we tend to sit in priority seats when we know there is no one else on the bus/train that needs them, but in Japan I have seen people remain standing even when no one is using the priority seats. So please be aware of the local etiquette before sitting down in a priority seat!
-
- http://www.japantimes.co.jp/wp-content/uploads/2015/09/n-keitaioff-a-20150922.jpg
- Eating/Drinking Although you may eat or drink on the subway, you should be conscious of respecting others by not making a mess and/or bringing something that has a prominent smell.
- Cellphone usage It’s not polite to talk on your cellphone inside the train/bus. You may, however, browse on your phone. But when it’s crowded and you’re near the priority seating, they advise you to turn off your phone completely due to the fear of electromagnetic interference that can mess with pacemakers.
3. Bus
Three important things to remember when taking the bus.
- Fare is paid after.
- Pay attention to where the doors to enter (入口) and exit (出口) are.
In most places, it is common to board from the back door and pay when you get off from the front door (with the exception of most Tokyo buses). - Pay with exact change.
Buses that charge a set fare
There are usually two types of buses, the ones that collect a set fare, or the ones that charge you by stops. If you happen to board a bus that has a set price, then just prepare the change during your ride and you’re good to go!
If you don’t have exact change, what do you do??
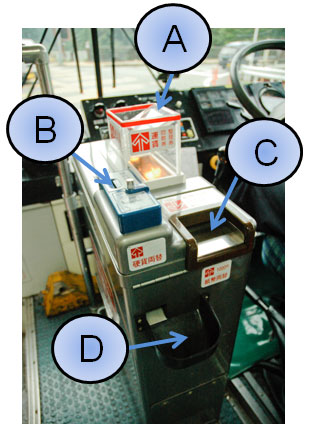
Luckily, Japanese buses anticipated this problem. If you don’t have change, you can just go up to the front of the bus for the change converter. Right next to the bus driver, there is a machine that collects the bus fare when you get off, and on the side of the machine there is also a change converter that can convert your 500 yen coins and 1000 yen notes into coins. Here is a more visual guide:
Buses that charge by stops
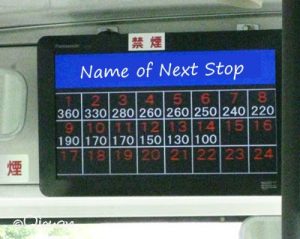
Now, back to buses that charge you by stops. The way you can tell how much to pay at the end of the ride is to look at the board at the front of the bus. When you first board the bus from the back door, you take a ticket from the seriken (整理券) machine. The number on the ticket indicates the bus stop number you have boarded. For example, you will get something like this:
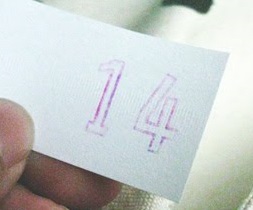
>>> then you would look at the screen at the front of the bus and find the corresponding number to figure out what your fare is, which in this case is 100 yen. As you go further along the route, the fare will also increase based on the number of stops.
4. Pasmo or Suica Card
I would highly recommend getting a rechargeable transportation card when taking the subway or bus in Japan. Similar to the Clipper card in San Francisco or the Tap card in Los Angeles, a Pasmo card or Suica card is rechargeable and can be used throughout Japan for travel on trains, buses, and subways.
You can get one of these cards directly at Haneda or Narita Airport, or any other participating train stations/bus depots (usually the major ones). To use, just tap it against the automated gates in train stations or the payment boxes on the buses, and the cost of your journey is automatically deducted. If you’re confused on where to tap, just look for the place that indicates “IC Cards”.
The Pasmo or Suica card can also function as an electronic wallet to make purchases at stores or vending machines, or to pay for services, such as parking spots or hotel accommodations.
Each initial purchase of the card includes a deposit of 500 yen, which is refundable when you return the card. So for example, if you first purchase a card for 2000 yen, you will have ¥1500 as fare and ¥500 as deposit.
Pasmo vs Suica
The Pasmo card and Suica card are sold by different companies. However, they both work the same way and can be used across Japan.
The only difference is the card return location to get your deposit back. You can only return the Pasmo card within the Tokyo area. So any non-JR subway line (such as Keihin or Keisei) or the Narita/Haneda Airport would work. You can return the Suica card within the Tokyo region. For this, you can go to any of the JR East stations.


5. Renting a car and driving in Japan
It is relatively convenient to rent a car in Japan if you want to have more freedom and drive instead. However, in order to rent a car, you must have an international license.
Getting an International License
If you already have a U.S. Driver’s License, it’s easy to get an international license! All you have to do is visit a local AAA office, fill out a simple application form (which you can print at home or do it there), provide them your Driver’s License and 2 passport size photos, pay a $20 permit fee and you’re ready to go! You can even apply for this through mail if you can’t find an office near you or if you’re out of the country. The permit is valid for 1 year so you can use it if you travel to other eligible countries during that year as well.
Although this process may vary from country to country, they should all be pretty simple! In the UK, for example, you can even apply for one from the post office.
Roads
In Japan, it’s important to know that people drive on the left. For those whom this is not the norm, it might be quite confusing (and possibly dangerous) at first, so you should be careful and pay attention to the roads.
Pedestrian crossings are clearly marked, usually with black and white stripes. If there are no pedestrian crossing markings, cars actually have the right of way.
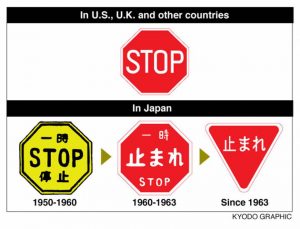
Japanese stop signs are shown in red rectangles. Although this might change in the future.
Another thing to note is to pay attention at railway crossings. You should keep your eyes and ears open because sometimes there may not be any signals that will tell you that the gate is about to close.


